What can you do yourself and what should you leave to the professional?
To answer the question “can I install solar panels myself,” you should ask a counter question: “how is my electrician knowledge?” The construction of a solar panel system comprises two jobs:
- The mounting of the panels on the roof
- The connection to the power network
Unless you have sufficient confidence in your own skills, it might be a piece of good advice to opt for teamwork: install the panels yourself and seek the help of an installer for the connection in the meter cupboard. In this article we limit ourselves to the installation of the panels on the roof, we tell you which tools you need and give some tips and advice. A comprehensive step-by-step guide for the installation of a solar panel system can be found at, among other places, TheSolarPlanner.com.
What does a solar panel system consist of?
Solar panels are for sale as complete systems, with everything you need for the installation. Such a system consists of:
- Solar panels
- Installation material
- Inverter, to convert the direct current from the solar panels to alternating current.
- Solar cabling. You need special cables to connect the solar panels and inverter to the meter cupboard.
These tools and safety features come in handy
- Mobile scaffolding and/or ladder
- Fall protection
- Cordless drill
- Spirit Level
- Tape measure
- Spanner/ring spanner (usually 13 mm or 15 mm)
- Allen key (usually 5 mm or 6 mm)
- Angle grinder or hacksaw
- Nippers
- Stripping Pliers
Laying plan
Before you climb the roof, you must know how and where you will place the solar panels. Various factors play a role in a laying plan.
- Shadows. The more sun the panels get, the more electricity they generate. Avoid placing in the shade of trees, dormer windows or other objects.
- Orientation. Solar panels give the highest return when placed on the south, but this will not always be possible. In that case, a placement in southwestern or southeastern direction yields about 5% less energy. Placement to the west or east results in 20% less return.
- Aligning. Nothing is as disturbing as when it looks like your panels are skewed. For a nice effect, you have to align the rows with the roof edge and the ridge. Do not rely solely on the spirit level, because often the ridge does not run completely parallel to the eaves.
- Slope angle. On a sloping roof, the inclination cannot be adjusted. On a flat roof, you can use special concrete feet to tilt the panels. A slope of around 10 or 12 degrees is common.
- Spacing. Solar panels are usually placed in rows. The correct distance between the rows is especially important on a flat roof because the slanted panels themselves cast shade.
- Distance to the roof edge. The eaves catch the most wind. To prevent damage to the solar panels, you must keep some space between the panels and the edge. A guideline: with a flat roof, keep the same distance between the panel and the roof edge as the height of the panel. With a sloping roof, a distance of 30 to 40 cm is sufficient.
- Distance to the inverter. Keep the distance between the solar panels and the inverter as small as possible to prevent energy loss. So place the inverter in the attic rather than downstairs in the meter cupboard.
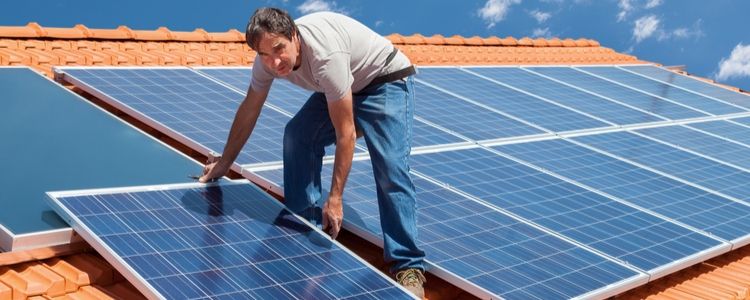
Installing solar panels on a sloping roof

The installation material for a sloping roof consists of roof hooks and rails. You attach the roof hooks under the roof tile. A rule of thumb: place a hook every 85 cm for a secure attachment. There are two types of roof hooks, screwed and clamped. The first type you can screw under the roof tile into the roof construction. Clamped roof hooks are clamped around the roof batten and roof tile. The rails are then mounted on these roof hooks – two for each row of solar panels – and you can easily clamp the panels onto the rails.
Installing solar panels on a flat roof
Installation is easier with flat roofs because the mounting material rests loosely on the roof, as screws could cause leaks. The installation is held in place by means of ballast, for example, stones or tiles.
Connecting the solar panels
You can connect solar panels in two ways:
- Series: all solar panels are connected to each other and the inverter.
- Parallel: each solar panel goes individually through a cable to the inverter.
The latter method has the advantage that shadow over a part of the system has less influence on the efficiency. The other panels continue to deliver completely.
The cable entry
Special feed-through pipes are available for feeding the cable to the inverter. It is important that this transit is completely watertight, which can sometimes be difficult, especially with a flat roof. Often an alternative transit is possible, for example through a ventilation pipe or just over the roof edge through the wall.
Safety tips
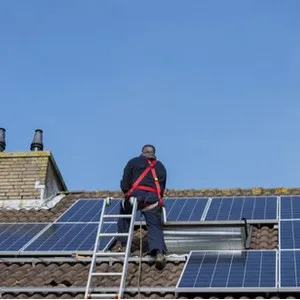
- Especially on a sloping roof, handling 25 kilos heavy panels, while trying to balance yourself, is not without risk. Scaffolding up to the roof edge works safer than a ladder, and fall protection is not a superfluous luxury.
- Wear work shoes with non-slip soles.
- Work preferably on a cloudy day. In bright sunshine, solar panels, even if they are not connected, can already be under voltage and give you a shock.